TABLE OF CONTENTS
Wishlist Plus’ ‘Save for Later’ feature enables shoppers to move items that they aren’t planning to purchase immediately from their cart to their ‘Save for Later’ list. If you are a business owner, you can leverage your shoppers’ ‘Save for Later’ list to send them email alerts and increase your revenue.
Before we start, follow the steps in this article to ensure you have set up the ‘Save for Later’ popup first. Once you have finished the steps mentioned in the article, follow the below steps to send email alerts to shoppers based on their ‘Save for Later’ list.
Pre-requisites:
- Wishlist Plus App Pro plan or above
Step 1:
Log in to your Shopify Portal account and navigate to the ‘Wishlist Plus --> Features’ option under the ‘Apps’ section on the left sidebar.

Step 1.1:
To re-engage users with email alerts, click on ‘Manage reminder emails’ under the ‘Nudge shoppers to come back to your store’ subsection.

Step 2:
Click on ‘Enable’ in the ‘Save For Later Reminder Emails’ section to get started.

Step 3:
To set up the email templates, click on ‘Manage’.

Step 4:
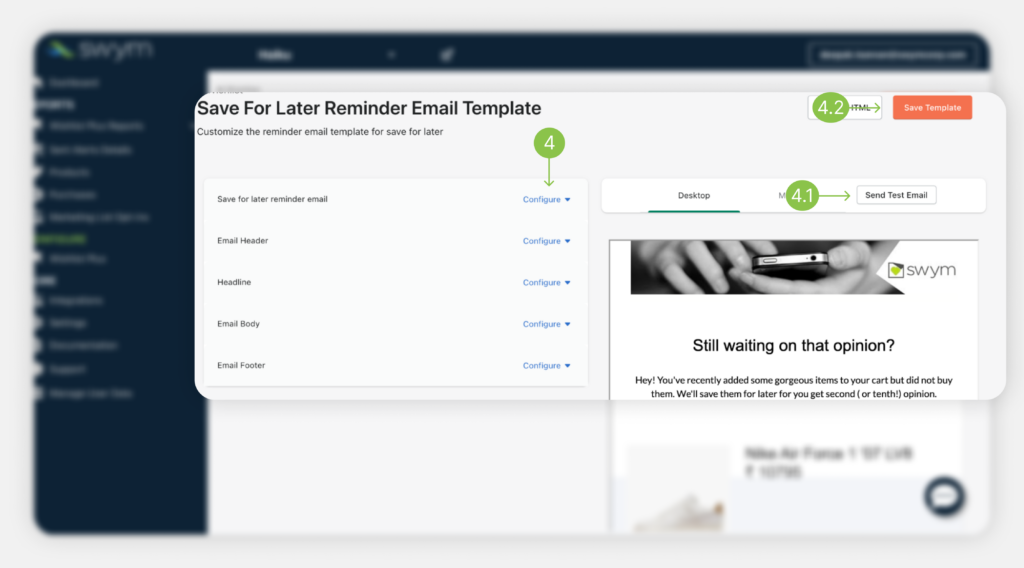
Enter the message that will go on the email, along with the images and the logos.
Note: You can preview the changes live on the right-side panel. The preview is available for both desktop and mobile.
Step 4.1:
Click on ‘Send Test Email’ to send emails to yourself to preview how the reminder emails will look.
Step 4.2:
Click on ‘Save Template’ once you’re satisfied.
Note: There is also an option to export the template as HTML.

Step 5:
Click on ‘Save Template’ once you are done.
Voila! You have successfully set up email alerts for shoppers based on their ‘Save for Later’ list.
Related Reads
- How to enable the ‘Save for Later’ feature on your website?
- How to show the ‘Save for Later’ feature only to limited users?
Was this article helpful?
That’s Great!
Thank you for your feedback
Sorry! We couldn't be helpful
Thank you for your feedback
Feedback sent
We appreciate your effort and will try to fix the article